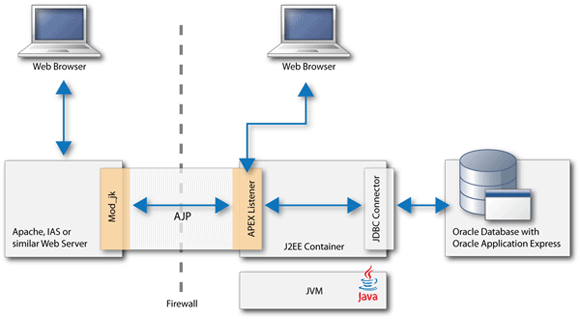
Many people are interested in how to configure the Oracle APEX Listener Apache Reverse Proxy Configuration utilizing AJP. This configuration has resulted to be very efficient (Free) compared to the other Weblogic (Costly) alternative configurations. Below you will find a diagram with what we want to accomplish.

Assumptions:
- This environment is Linux CentOS 5+ 64 Bit
- Oracle XE 11g and Oracle APEX is already installed and configured
- Oracle APEX images directory are located in /oracle/apex/images
First we make sure our system is updated. As root:
# yum update
Install Apache httpd if its not already installed. As root:
# yum install httpd
Configure the httpd service to run reverse proxy with the APEX Listener
First make a backup of the httpd configuration file, as root:
# cp /etc/httpd/conf/httpd.conf /etc/httpd/conf/httpd.conf.original
Modify your httpd.conf file to add the reverse proxy calls from and to the Apex Listener. As root user:
# vi /etc/httpd/conf/httpd.conf
Add at the end of the file httpd.conf:
ProxyRequests Off

Order deny,allow

Allow from all

ProxyPreserveHost On

ProxyPass /apex ajp://localhost:8009/apex

ProxyPassReverse /apex ajp://localhost:8009/apex

ProxyPass /i ajp://localhost:8009/i

ProxyPassReverse /i ajp://localhost:8009/i
Restart the httpd service for the changes to take place. As root:
# service httpd restart
Download the latest Oracle Apex Listener version:
http://www.oracle.com/technetwork/developer-tools/apex-listener/downloads/index.html
Unzip the Apex Listener compressed file in /oracle/listener . As oracle user:
# unzip apex_listener.zip
The first time you run the Apex Listener you must run in the command prompt without the “&” at the end. The reason is that the configuration requires the administrator to assign a user and password to the Listener Admin and Manager. As oracle user:
# java -Dapex.home=/oracle/listener/apex -Dapex.images=/oracle/apex/images -Dapex.ajp=8009 -Dapex.erase -jar /oracle/listener/apex.war
(Optional) The subsequent times you run the Apex listener you can use “&”. For example:
# java -Dapex.home=/oracle/listener/apex -Dapex.images=/oracle/apex/images -Dapex.ajp=8009 -Dapex.erase -jar /oracle/listener/apex.war &
The first time you log in you need to go to the listener configuration website and add the connection information for your database and APEX_PUBLIC_USER user account:
http://localhost/apex/listenerConfigure
Enjoy your new Apex using your reverse proxy configuration!!!